Contouring and highlighting are powerful makeup techniques that can enhance your natural features, giving your face a sculpted, glowing appearance. These techniques might seem complicated at first, but with a little practice and the right tools, anyone can learn how to contour and highlight like a professional. This guide will break down the process step-by-step so you can achieve flawless results.
Understanding the Purpose of Contouring and Highlighting
Before you begin applying makeup, it’s important to understand the purpose of contouring and highlighting and how these two techniques work together to create a balanced look.
What is contouring?
Contouring uses darker shades of makeup to create shadows on your face, sculpting and defining the natural bone structure. It typically involves applying contour products to the hollows of the cheeks, jawline, forehead, and sides of the nose. This adds dimension to the face, making it appear slimmer and more sculpted.
What is Highlighting?
Highlighting, on the other hand, uses lighter shades to emphasize the high points of your face. By applying highlighter to areas like your cheekbones, the bridge of your nose, and your cupid’s bow, you bring light to those features, creating a luminous, fresh appearance. When done together with contouring, highlighting helps to enhance your face’s natural shape.
Essential Tools for Contouring and Highlighting
To achieve a professional look, having the right tools is crucial. Here’s what you’ll need:
Contouring Products
Contouring products come in different forms, each offering a unique finish. For a smooth application:
- Cream contours blend well and are ideal for dry skin. They provide a natural, skin-like finish.
- Powder contours offer a matte finish, making them perfect for oily skin.
- Stick contours are easy to apply and great for beginners, as they provide quick and precise application.
Highlighting Products
For highlighting, there are also several types of products:
- Powder highlighters are best for setting your makeup while giving a soft glow.
- Cream and liquid highlighters provide a more intense glow and are perfect for a dewy finish.
Brushes and Tools
Having the right brushes will help blend your contour and highlight seamlessly into your skin. Use an angled brush for contouring and a fan brush for applying highlighter. A blending sponge is essential to smooth out any harsh lines and create a natural finish.
Step-by-Step Guide to Contouring and Highlighting

Now that you have the tools, let’s walk through the process.
Prepare Your Skin
Start with a clean face. Use a gentle cleanser to remove any dirt, and then moisturize to create a smooth base for makeup. Applying a primer is also a great idea, as it helps makeup stay in place longer.
Apply Foundation
Choose a foundation that matches your skin tone and apply it evenly across your face. This step will even out your complexion, creating a flawless base for contouring and highlighting.
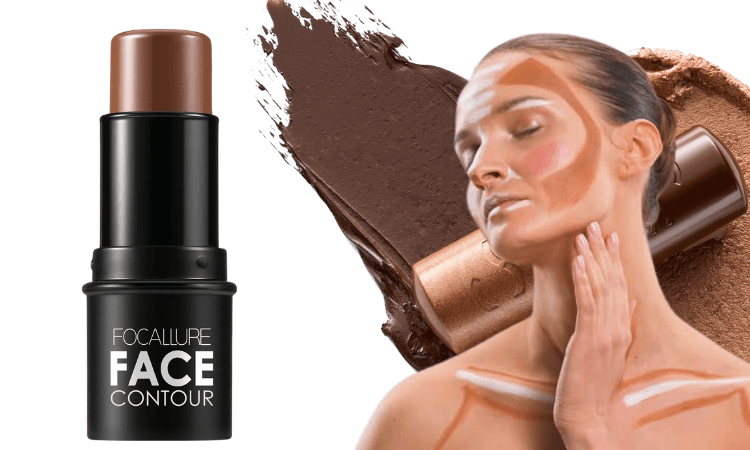
Contour the Face
To contour, apply a product that’s a few shades darker than your natural skin tone. The main areas to contour are:
- The hollows of your cheeks: Apply contour beneath your cheekbones and blend upwards.
- The jawline: Apply contour along your jawline to create definition.
- The forehead: Apply contour along the hairline to reduce the appearance of a larger forehead.
- The nose (optional): For a slimmer nose, apply contour along the sides and blend carefully.
Remember, blending is key. Use a beauty sponge or brush to ensure the contour is well-blended and natural-looking.
Apply Highlighter
Now it’s time to highlight. Apply highlighter to the high points of your face where light naturally hits:
- Tops of your cheekbones
- Bridge of your nose
- Cupid’s bow
- Brow bones (optional)
Blend the highlighter gently into your skin for a natural, radiant glow. This will enhance your features and give your face a soft, dewy finish.
Set Your Makeup
To lock in your contour and highlight, set your makeup with a light dusting of setting powder or a setting spray. This will keep your makeup in place throughout the day and prevent it from fading.
Tips and Tricks for a Professional Look
Achieving a professional-looking contour and highlight requires practice and a few key techniques.
Start Light and Build Gradually
It’s better to start with a light application of contour and highlighter, building up intensity as needed. This helps avoid overdoing it and creates a more natural look.
Blend, Blend, Blend
Blending is essential to avoid harsh lines. Make sure to blend your contour and highlighter until they seamlessly merge into your skin. A beauty sponge or blending brush is perfect for this step.
Choose Shades that Complement Your Skin Tone
Contouring and highlighting products come in different shades. Make sure to choose products that match your skin tone for the most natural effect. For fair skin, opt for cooler contour shades and lighter highlighters. For deeper skin tones, warmer contours and gold or champagne highlighters work best.
Keep It Subtle for Daytime
For daytime makeup, keep your contour and highlight more subtle. You don’t need to go heavy on contouring for everyday wear. A softer contour and light highlight will give you a natural, radiant glow.
Common Mistakes to Avoid
Here are a few common mistakes people make when contouring and highlighting:
Overdoing the Contour
It’s easy to get carried away with contouring, but applying too much can make your face look harsh. Stick to subtle contouring to maintain a natural look.
Not Blending Enough
Blending is crucial for a flawless finish. If your contour and highlight aren’t well blended, it will be obvious. Always take your time to blend everything in.
Choosing the Right Shades
Make sure to pick contour and highlight shades that complement your natural skin tone. Products that are too light or too dark can create an unnatural effect, so be mindful of matching shades.
Conclusion: Mastering Contouring and Highlighting
With the right products, tools, and techniques, you can contour and highlight like a professional. The key is practice. Start slow, blend well, and experiment with different products to find the best look for your face. In time, you’ll be able to enhance your natural beauty and achieve a sculpted, glowing look effortlessly.